Monday, April 30, 2012

Birthday Banner

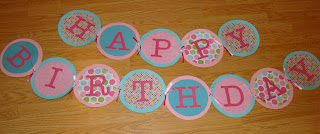
I'm finally getting around to writing about Sara Kate's birthday banner, yay!  About 2 weeks before her party I got a wild hair and started wondering about a banner.  I started searching Etsy and of course banners can be pricey (although adorable) plus I was on a tight time schedule.  So I started searching 'how to make a birthday banner' on Google.  I came across 2 websites that were quite helpful and I actually thought, I can do this!!  The websites I used for a guide are here and here and I kind of did a combination of what they both said.  I found the tutorials quite helpful (obviously) so I thought I'd do my own little tutorial, kind of like when I wrote out how I made Sara Kate's wall letters.   

First things first, I went to Hobby Lobby and pick out scrapbook paper which was actually quite a challenge because as you know, they have tons and tons and tons of paper to choose from.  I wanted to use lots of pink and turquoise and polka dots when possible.  I finally picked my paper and of course I bought way too much because I had no idea what I was doing and I am soooo NOT artistic.  I also picked out what ribbon I wanted to use, which I also bought way too much of.  So here's what I did next:

Step 1: When I was at Hobby Lobby, I bought a package of cardboard letters (which were like $4-$5) and traced them out on heavy scrapbook paper.  I debated on what exactly to spell out...Happy Birthday, Happy Birthday Sara Kate, or Happy 2nd Birthday.  In the end, I just decided on a generic Happy Birthday.  I can use it again in the future if I want and anyone could borrow it if they wanted to since it is generic.
 
Step 2: I used bowls from my cabinet to trace out the inside circles (and I could get 2 circles to a page) and then used the next bowl size up to trace the larger circles (and could only get 1 to a page).  The inside circles were cut from thinner paper, while the big outside pink and turquoise circles were cut from heavier paper.
Step 3: Once I had all my circles cut out it was just a matter of deciding what order I wanted the designs and gluing the small circles on the larger circles.  Of course I knew the large circles would alternate pink and turquoise but choosing the pattern of the inner circles was tough!  I know, I'm a weird perfectionist! :-)
 
 Step 4: Glue the letters in place!  I was so excited when I got to this step and saw it coming together!
 Step 5: Cut the ribbon pieces to tie the circles together.  I think I cut them about 8 inches long and decided to double up and use pink and white (I couldn't find the right kind of ribbon in turquoise or the right color for that matter).
 Step 6: Hole punch the edges.  There is absolutely nothing technical about this step, and I certainly didn't spend a great deal of time making sure everything was perfectly even.
 Step 7: Tie the lettered circles together!  I ended up double knotting the ribbon between each circle.
 Step 8: Hang it!!  I decided the bay window area behind our table was a good place.  There was plenty of room for it to hang and I already had good places to tie it to.  We had the cake on the table and we put the presents there initially so I think the banner made a nice background.  Plus you could see it when our family walked into the house.
 
 So there it is!  How to make a birthday banner from a NON artistic person!! I was nervous when I decided to start the whole project, but I was really happy with the way it turned out. Hopefully this helps somebody out there!

Since this is a 'what I made' post, I also wanted to share how I displayed Sara Kate's 13-24 month pictures.  Since I could only get 1 big circle drawn (the turquoise and pink background circles) I was wasting paper (see picture above in the tutorial).  I grabbed a picture and eyeballed how much 'background' paper I would need to mount a 4x6 picture.  As I was cutting circles, I cut out the corner rectangles (I put the bowl as close to the edge as I could so I had a good 4x6-ish rectangle).  I mounted the pictures with tape so I could pull them off and save them, I hole punched and secured the mounted pictures with ribbon (my mom helped with this part), and then we ended up having to secure the back with paint stirrers taped to the back to sturdy it (my mother-in-law's idea).  It's not perfect but I think it turned out really cute and it was exactly what I had in mind.  It was hung to the left of the banner.
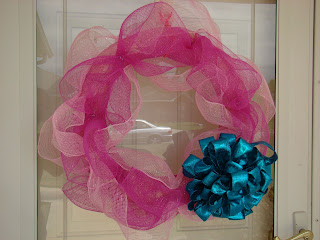
The final 'artsy' thing I decided to do (very last minute) was make a wreath for the door using that Deco Mesh stuff (think that's what it's called??).  My mom made the bow (she needs to teach me how to do that!!).  I don't have a tutorial or anything for it, but I just kind of messed with the mesh until I got it looking the way I wanted to.  I also think this turned out quite cute!
 
So there were my artistic projects that I made for Sara Kate's birthday.  They weren't that hard and they weren't that costly and I gotta admit that I was proud of the way everything turn out (like I mentioned several times, I am sooo NOT artistic!!).  I might could even talk myself into doing some similar projects in the future! :-)

Wednesday, April 25, 2012

Wednesday

This week seems to be dragging a little bit.  Yesterday was Tuesday but it felt like it should be Wednesday and today it's finally Wednesday but it seems like it should be Thursday.  I'll be glad when it's finally Friday!  I still need to post about how I made Sara Kate's birthday banner and a couple other things I made for her birthday, but I today I thought I would quickly post a little look into our day.

Of course it's a school day but a certain little missy was not ready to wake up this morning!
 
When she finally did, I got her dressed and out the door we went, but not before a little 'cheese' with Daddy!
 
I stayed late at work today so we were later getting home but luckily dinner was in the crock pot so everything was when we got home!  Sara Kate has been eating alot of finger foods lately (lots of fruit, crackers, grilled items like hamburger and chicken) so it seems likeshe hasn't really had to use a spoon recently.  I'm sure she has I just haven't paid that much attention.  Well, she ate her soup like a champ and she's doing so well using her spoon!!  I thought I'd video it and share it.
After dinner it was play time!!!  But first Sara Kate couldn't find her 'umpa' (paci, and it was on the table).  I was telling her she didn't need it right then because she's a big girl but she was throwing a giant fit.  When she gets mad she will swipe at me but this time she went to her little table and took out her frustration, picking up one thing at a time and throwing it.  Then she pushed the chairs over.  Then in her final act of frustration, she moved the table, ha!  
 
I caved and gave it to her.  
Ya'll, I think she's more dependent on that stupid thing now than she was a month ago!  I said that 2 was the magic age to cut it but now I don't know how to take it away!!  HELP!!  If anyone reading this has any suggestions, please share!!  

Anyway, when that tantrum was over and since the table was moved away from the wall, I thought I should vacuum.  Another tantrum started because Sara Kate is TERRIFIED of the vacuum cleaner!!!!  I mean scream, cry, hide, all while saying 'no-no' and 'help me.'  She is so afraid of it which is kind of funny because she used to love to 'help' by carrying the cord around.  Not anymore!  I'm a mean mommy and took her picture while she was upset.
But all became right with the world when the vacuum went back to it's scary closet and we went outside to play!  Swing and bubbles are the two things she wanted to do.  That girl would swing all night long, she loves it so much.
 
However, when it was time to come inside, ANOTHER tantrum started because she did NOT want to go inside!!  I think she would live outside if we would let her.  She did NOT want to come inside and she NOT want to take a bath.  But if she had to take a bath, she did NOT want to do it without her umpa.  That time I did not cave, although it meant blood curling screaming the entire bath time...'help me, help me, umpa umpa.'  She finally calmed down when she was ready to get out and brush her teeth.  But more crying started when I wouldn't let her have a bow in her hair for bed time.  I know, mean mommy.  But all is right with the world now, asleep with her umpa and her 2 Elmo's.
So there's a little look at our Wednesday.  It sounds kinda miserable with all the screaming fits I mentioned but it wasn't that bad.  I just need to get rid of that dang 'umpa!' :-)  Happy mid-week everyone!

Sunday, April 22, 2012

Sara Kate's Owl Party

Yesterday we had Sara Kate's 2nd birthday party at Gulley Park in Fayetteville.  I got the idea to have it there back in the fall when I took Sara Kate to the park one Saturday morning to play and a party was being held in the pavilion.  I asked a lady there how to have a party there and she said just go to the City of Fayetteville's website and it lists all the parks and you can reserve the pavilion that way.  Here's the website if any NWA folks are interested.  But she said to reserve early because it books fast.  When I realized Sara Kate's birthday was going to fall on Easter, I figured that wasn't a good weekend to have her party.  The following weekend Chris had an out of town school function so we decided her party date would be April 21 (and we decided that and I reserved the pavilion back in February).  Ever since we decided on an 'outside' party, I've been praying for no rain and a pretty day because I had no back up plan! :-)  A week ago the forecast was sunny and 75 then a stupid cold front had to move in.  We had rain Friday morning and then it got cold!  It was in the 30's when we woke up Saturday morning, but thankfully it turned out to be a gorgeous day, around 60 degrees.  It was a small party, and we invited a couple of Sara Kate's school besties and some of her church friends.  As I mentioned in her family birthday party blog, I did a theme of owls.  Here's the invitation I found and had made on an Etsy site, and I had the file emailed to me and I printed it in town.  Basically I just wanted owls, with lots of pink and turquoise as the colors.
I absolutely loved her dress that my friend Jennifer made, but once I got it and tried it on Sara Kate, I decided that it was too long for her to be trying to climb all over the play equipment at the park.  I contacted a girl I met locally (from I Live By Faith Boutique, who I have mentioned in a blog before) about making Sara Kate an owl t-shirt, using turquoise and pink.  She did with the help of her friend at Make It Initial, and she ended up making some little ruffle shorts to match for free.  The outfit turned out too cute for words!  Unfortunately, we didn't get a good picture of Sara Kate wearing it on her party day, but it looks like this (outfit had just been washed when I took the picture so excuse the wrinkles!).
We missed getting pictures of how I decorated so I'll just tell you about them and you can use your imagination. :-) I took the birthday banner I made (which I am still planning to blog about) and planned on hanging it but the wind hampered that little plan.  So we taped it up in the pavilion.  I had pink and turquoise plastic table cloths and then I used pink balloons that we anchored in little silver buckets with clear marbles as the centerpieces.  I found white and turquoise dot plates at Wal-Mart, turquoise and white polka dot napkins at Target, and we had cupcakes on little pink plates.  I got the cupcakes at Sam's and they were white cake with pink frosting (delicious and very cheap!!).  For food we had pizza (can't beat Eureka Pizza's $5 carry out special!!), I made fruit skewers with strawberries, grapes, and oranges, and I had a basket of Goldfish crackers or Cheez Its. I found a big plastic bowl and a plastic platter that were turquoise at Wal-Mart (and only $1) that I used for the fruit and cracker bags. For drinks we had Capri-Suns for kids and water, Diet Coke, or Dr Pepper for parents. I decorated the tables under the pavilion but then we ended up eating on the tables that were in the sun because it was warmer.  Oh well.  We let the kids play for a while, then ate lunch, had cupcakes, and let Sara Kate open her presents.  And then of course, they headed back to play some more!  Here are some pictures from Sara Kate's party.

It was sweet Landry's first trip to the park! She just celebrated her first birthday a week ago and we're so glad she came and hung out!
 Sara Kate and her bestie, Grayson!  These girls are so precious!


For party favors, I had Holly from The Doughmestic Housewife make the most ADORABLE owl cookies!!  I got in contact with her back in mid February after we set the party date, and we've been in contact ever since.  I just told her owls and pink and turquoise.  When I met her Friday to pick them up I was just amazed...she's extremely talented!  Needless to say, she was great to work with and I'm sure I'll utilize her talent again at some point in the future!
 I made the little favor tags on the computer here at home, and I just printed them on cardstock.  I think they turned out really cute.
Overall, I'd say Sara Kate's first 'friends' party was a success.  She had a great time and I'm sure she loved having all her friends around.  The last picture I'll leave you with is one I think is awesome...haha!  If you're my Facebook friend you've seen it but if not, here ya go and here's the story.  As we were cleaning up, the next group that had reserved the pavilion got there to set up.  The guy pulled their big cooler in and said something, and I looked up and just blurted out, 'Oh my gosh, you're Dan Skoff!'  For those of you not from NWA, he's our weather man on our local NBC station (our news station of choice) and I think he's great (he rapped the weather forecast Friday night...it was HILARIOUS!  Check this out!).  I was such a dork, seriously, and I'm sure Chris was so embarrassed, HA!  But he was really cool to talk to and he seems like a really nice guy (and he's really tall!).  He even borrowed our duck tape. :-)  And of course, I made Sara Kate get her picture with him.  It's just a crappy cell phone picture because Chris had already put his camera away.  Just so ya know, he's not holding up a peace sign, he's holding up 2 fingers because Sara Kate turned 2!  That experience made my day! :-)          

Monday, April 16, 2012

Easter Sunday

Easter Sunday was a double blessing in the Michaels household. As you know, our precious baby girl turned 2, but also, it's the day that our Savior was risen from the grave! Hallelujah! We went to church (and had an amazing service!!), and then came home to see what the Easter bunny brought Sara Kate! When we were kids our parents told us the Easter bunny wasn't like Santa Claus and couldn't come in the house so he would always leave our baskets in the garage. Interesting how he could get into the garage (which was closed) but not the house...things that make you go hmmm... :-) Anyway. Since apparently the Easter bunny can't come in the house, he left Sara Kate's basket outside the front door. My grandmother sent Sara Kate the Easter book (it was my cousin Sara's) so I thought I'd stick it with her basket. The Easter basket she's using was mine, and I got my mom to make a new bow to put on it.
She was so excited to see her loot!
Uncle Phil and Aunt Holly also brought her a basket of goodies!
Her Gran and Pop(pa) brought her a bag of Easter goodies, too! What a lucky little girl!
After she opened all her baskets, she went egg hunting for the eggs we dyed the night before! She did great finding them all and even wanted to do it again!
The last thing we did before lunch and before my parents had to leave was take some family pictures, which is VERY important to me. I love seeing Sara Kate with my brother, with my parents, and of course, with us.
I love this picture so much...and I love the picture above of the 3 of us. Who am I kidding, I love all the pictures we took this day!
We had a wonderful Easter, and like I said in Sara Kate's birthday post, I was so glad that my parents and brother and sister-in-law were here to celebrate the entire weekend with us!